
Scenario
Introduction part
Sarah Spatula and Eugene Test Tube are working in the laboratory arranged in the classroom. They are dressed up with lab coats, gloves, mask and glasses. The children are entering in the classroom accompanied by the teachers, and they sit on the chairs placed in semi-circle in the “laboratory”. A short performance is presented by the two main characters. They are searching intensively in papers, books and on the internet, it is visible that they do not find what they are looking for. In one moment Eugene Test Tube has a bright idea: “Let’s ask the children! Maybe they know the solution.”
First the two researchers introduce themselves to the children, showing a test tube and a spatula to demonstrate the origin of their names. They explain why they wear lab coats, safety goggles, masks and gloves (Fig. 2).
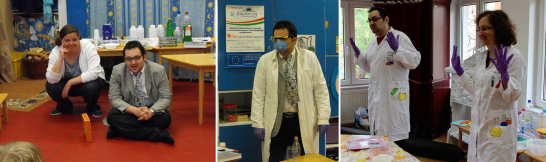
Figure 2. Introduction and presentation of frame story
With spectacular and non-hazardous experiments the children are introduced in the world of the sciences. All experiments are done by children, assisted by the activity leaders. The children are coming one-by-one to the “stage” to perform a small part of an experiment. It is very important for every child to be involved in the activity. During, or at the end of each experiment a short explanation is given by the two researches to summarise the physical and chemical phenomena. Explanations are based on the previous knowledge gained in kindergarten or primary school. Questions are raised continuously during the activity.
Standard experiments of the activity (the order and the number of the experiments can be varied depending on the location and participants’ number)
The first experiment (EXP 1) is dedicated to the concentration and density. Four children are asked to hold in their hands a transparent plastic cups in the front of the class. Another four children measure sugar in the cups one-by-one: two spoons in the first, five in the second, nine in the third and thirteen in the last one. The activity leaders are counting loudly together with the children the number of the spoons. A different four children are pouring water in the cups and the cup holder children are mixing the sugar and water with the plastic spoon. Four different food colours – red, yellow, green and blue – are dropped by the children into the sugar solution. Coloured solutions are layered one-by-one into a test tube using a syringe. A competition is performed by the two main characters to create a nicer rainbow (Fig. 3). The participants vote whose rainbow is the most beautiful.

Figure 3. Rainbow-creation with sugar and water
Questions raised during the activity:
- Which colour will be the upper and which will be the lower in the rainbow?
- Why we get this order of colours?
- Why are the solution layered?
- Why we see different colours at layers interfaces? (as example purple at the interfaces of red and blue colours)
- What happened when we mixed the solutions in the test tube?
To highlight that the solution with the highest sugar concentration will lay always at the bottom, another experiment is performed. The solution with the lower sugar concentration is poured into the test tube, and then the solution with the highest sugar concentration is added. The more concentrated solution will sink to the bottom of the test tube.
Following the experiment connected to water, an experiment with ice is performed (EXP 2). Water is frozen previously in two disposable soup plates. The ice is transferred from the plate into a tray. To present the melting process each of the children put a hint of kitchen salt (NaCl) on the ice surface. The children can hear the cracking sound of the melting ice (using a metal tray the effect is more intensive). The tray is placed away for approximately 10-15 minutes.
The third experiment (EXP 3) is dedicated to milk (Fig. 4). Three disposable plastic flat plates are filled with milk and the four food colours are dropped by the children in four different areas of the milk surface. By the magic stick (previously immersed into the dishwashing liquid) the movement of the food colour spots on the milk surface is initiated.

Figure 4. Experiment with milk
Questions raised connecting to the experiment:
- Which kind of liquid is placed on the tip of the magic stick?
- Why are the spots moveless before their interaction with the dishwashing liquid?
After the explanation everybody can try the magic stick.
Now Sarah and Eugene return back to the semi-melted ice (EXP 2). Food colours are dropped by the children on the top of the ice (Fig. 5.). Due to food colours children can check the capillaries in the semi-melted ice.

Figure 5. Melting of the ice
Questions raised:
- What happened with the ice after salting?
- Why do we hear a sound during the melting process?
- Why is it forbidden to salt the street during winter-time (environmental aspects)?
Oil and water relationship is investigated during the fourth experiment (EXP 4). One-by-one the children are filling water, food colour and oil in a transparent plastic bottle. One sparking tablet is placed into the bottle, this way the children can monitor the coloured bubbles moving up and down through the oil phase (Fig. 6.).

Figure 6. Experiment with oil and water
Questions raised:
- Why do oil and water not mix?
- What is happening during the reaction of the sparking tablet with the water?
- Why the coloured bubbles move up and down in the bottle?
Another experiment will be introduced by the next question (EXP 5): Who did not wash his or her teeth this morning? The well-known elephant toothpaste experiment is set up with the kindergarten or primary school children (Fig. 7). Yeast is mixed in a plastic cup with hot water by a pupil; it is poured by another child in a transparent plastic bottle with the help of a funnel. Dishwashing liquid and two different food colours are added by other kids to the mixture from the bottle. The hydrogen peroxide is added by the researchers. Due to the reaction foam is produced in a spectacular way.

Figure 7. Elephant toothpaste experiment
Questions raised:
- What is the role of the yeast in households?
- Why is it better to use hot water then cold water?
- Why do we see a lot of foam?
- Why is the hydrogen peroxide added by the researchers?
It is important to highlight that the children have to understand that the experiments can be dangerous, so at home any experiment can be performed only assisted by their parents.
To set up the forthcoming experiment Eugene reveals a secret to the children: he cannot blow up a balloon by himself (EXP 6). Sarah shows how to blow up a balloon with the help of chemistry. First, using vinegar, the researchers teach the children how to smell a chemical.
One of the researchers pour vinegar into a plastic bottle, the balloon filled with baking soda is previously prepared. The neck of the balloon should be pulled on the throat of the bottle and the baking soda can be poured into the vinegar. While the balloon is blowing up the children can listen to the noise produced by the CO2 formation (Fig. 8.).

Figure 8. The chemical solution for Eugene´s secret
Questions raised:
- What is the role of the vinegar in households?
- When did children see similar gas formation at home or here, during the activity?
- Where will move the blown balloon: up or down, and why?
Thanks to the time spent with the class and due to the performed experiments, the researchers find out the missing component (kindergarten frame story). As a reward, all the children get a special diploma containing their name and the acknowledgement of the two researchers (Fig. 9). On the diploma there is a free space, where the children can draw the most interesting experiment either in school, or at home.

Figure 9. Diploma closing ceremony


